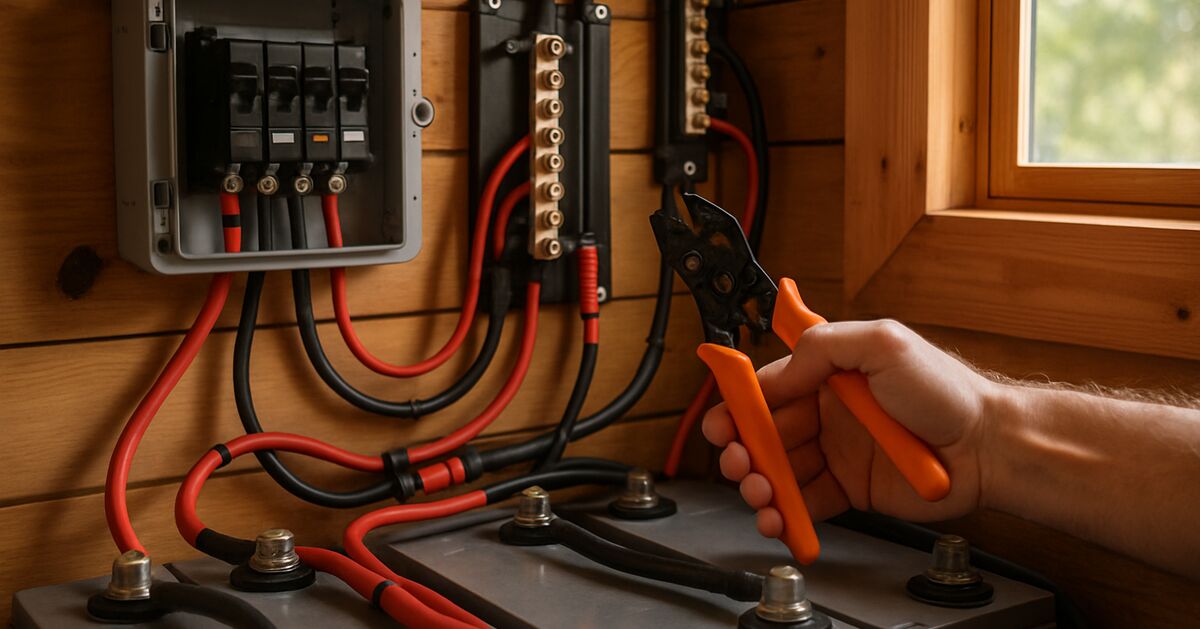
A solar panel by itself is nearly harmless. A battery bank by itself just sits there. But connect them together with the wrong wire, no fuse, and no plan for what happens when something shorts out, and you have built yourself a genuine fire hazard. This is the part of off-grid solar that scares people off, and honestly, it should get your full attention. The good news is that the underlying logic isn't complicated once someone walks you through it in plain terms.
This guide won't turn you into a licensed electrician, and it isn't a substitute for the National Electrical Code, your inverter's install manual, or a local inspector's sign-off where permits apply. What it will do is explain the why behind fuses, breakers, and wire sizing so that when you read a wiring diagram or a component's spec sheet, it actually makes sense instead of looking like a wall of numbers.
Why overcurrent protection exists at all
Every wire has a maximum amount of current it can carry before it heats up dangerously. That heat comes from resistance: electricity moving through a conductor generates heat, and the thinner the wire, the more resistance per foot, and the hotter it gets for a given current. Wire insulation is rated to handle heat up to a point. Beyond that point, insulation melts, conductors can short against each other or against metal enclosures, and you get sparks, melted plastic, or worse, a fire inside a wall or battery box.
A fuse or breaker's entire job is to open the circuit before the wire gets that hot. It is not there to protect your battery or your inverter, those usually have their own internal protection. It is there to protect the wire itself, and everything around that wire, from overheating. This is the single most important idea in this whole topic: the fuse or breaker size is chosen to protect the wire, not the device at the end of it.
Once that clicks, the rest of the sizing logic starts to make sense as a chain: figure out how much current will actually flow, size the wire to carry that current safely with acceptable voltage loss, then pick a fuse or breaker that will trip before that wire's safe limit is exceeded.
Working out actual current draw
Before you can size anything, you need real numbers, not guesses. For a solar charge controller circuit, the relevant current is the controller's rated maximum output (or input from panels), not just "whatever the panels put out on a sunny day." For inverter circuits, current draw is tied to how many watts the inverter can push, divided by your system voltage. This is one of the reasons the choice between 12V, 24V, and 48V system voltages matters so much for wiring: the same 3,000 watt load pulls roughly 250 amps at 12 volts but only about 62.5 amps at 48 volts. Higher voltage systems need dramatically thinner, cheaper wire for the same power delivered, which is a big reason many larger cabins move to 24V or 48V battery banks.
A rough load list looks like this for a mid-size setup:
Charge controller output to battery bus: rated max output current of the controller, often 40 to 60 amps for a common MPPT unit
Battery bank to inverter: inverter's rated continuous watts divided by nominal battery voltage
Battery bank to DC distribution (lights, fans, water pump): sum of everything that could run at once, with headroom
Any single high-draw appliance: sized on its own dedicated circuit
Always size wire and protection for the worst realistic case, not the average. A refrigerator's compressor start-up current is higher than its running current. An inverter under full load pulls far more than it does idling. Build in margin.
The 125 percent rule and why codes use it
Most electrical codes, including the guidance most solar installers follow, require that continuous circuits (running three hours or more, which describes almost everything in a solar system) be sized at 125 percent of the calculated maximum current. So if your charge controller can output 50 amps continuously, the wire and overcurrent device on that circuit should be rated for at least 62.5 amps.
This isn't arbitrary caution stacked on caution. It accounts for real-world conditions: wire bundled with other cables loses some of its heat-dissipating capacity, ambient temperatures inside an enclosure run hotter than open air, and continuous loads generate sustained heat rather than a brief spike. The 125 percent margin is the buffer that keeps a "just barely adequate" circuit from becoming a marginal one after a hot afternoon in a poorly ventilated battery box.
Choosing wire gauge: it's about voltage drop too
Ampacity, meaning how much current a wire can safely carry, is only half the wire-sizing question in a DC solar system. The other half is voltage drop. DC systems run at low voltages compared to household AC, and low voltage systems lose a much larger percentage of their power over distance for the same wire gauge.
Here's why that matters practically: a 3 percent voltage drop on a 120 volt AC circuit is a rounding error. A 3 percent drop on a 12 volt DC circuit is meaningful, and by the time you're running long wire from panels mounted away from the cabin, or from batteries to a distant distribution panel, drop can climb well past that if the wire is undersized. Voltage drop wastes energy as heat in the wire (again, heat) and it can starve appliances of the voltage they need to run properly. Charge controllers can also misread battery state if the sensing wire has significant drop.
The practical takeaway: for any run longer than a few feet, especially at 12V, size wire for voltage drop first, and check that it also satisfies the ampacity requirement (it usually will, since voltage drop sizing tends to be more conservative over distance). Wire gauge charts that account for both amperage and distance appear in standard solar reference material, and matching your actual run length to the chart, not just the amperage, is an easy step to skip.
As a general rule of thumb: longer runs and higher current both push you toward thicker wire (a lower AWG number). A run from a battery bank to a nearby inverter might be fine on 4 AWG, while the same amperage over a 30 foot run to a detached shed might need 2 AWG or thicker to keep drop acceptable. There's no substitute for actually calculating it against your specific distance and current instead of guessing.
Fuses vs breakers: what actually differs
Fuses and breakers do the same fundamental job, but they behave differently enough to matter for how you design a system.
Fuses are simple and cheap. A fuse contains a metal element that melts and opens the circuit once current exceeds its rating for long enough. Once it blows, it's done, you replace it. For DC solar applications, look specifically for fuses rated for DC use (an AC-rated fuse may not safely interrupt a DC arc, which behaves differently than AC because there's no natural zero-crossing to help extinguish it). Common types in solar setups include ANL fuses for high-current battery cable protection and MRBF or Class T fuses for very high current, low-resistance situations right at the battery terminal.
Breakers cost more but reset with a flip instead of a fuse replacement, and many double as a manual disconnect switch, which is genuinely useful for maintenance and for an emergency shutoff. DC-rated breakers are essential here too; using an AC breaker on a DC circuit is a common and dangerous mistake because it may not interrupt a DC fault reliably.
A well-designed system usually uses both: a main disconnect breaker near the battery bank that lets you kill the whole system by hand, plus fuses or breakers on individual circuits (solar input, inverter, DC loads) sized to that specific circuit's wire.
Where fuses actually need to go
A fuse protects the wire downstream of it, which means the fuse needs to sit as close as possible to the power source, ideally within a few inches of the battery terminal for the main battery cable. If a wire runs a foot or two unprotected before reaching its fuse, that unprotected section is a vulnerability: a short anywhere along that stretch won't trip anything.
Typical fuse and breaker locations in a basic system:
Between the battery bank and the busbar or main disconnect: sized for total system current
Between the busbar and the inverter: sized to the inverter's max continuous draw at 125 percent
Between the solar charge controller and battery: sized to the controller's max output at 125 percent
Between solar panels and the charge controller: sized to the panel array's max output current, per the controller manufacturer's guidance
On individual DC load circuits: sized to whatever that circuit actually needs
Every one of these should be labeled. A future version of you, or anyone else troubleshooting the system later, needs to know at a glance what each breaker feeds.
Grounding and why it isn't optional
Grounding is the part people are most tempted to skip because the system "works fine" without it. But grounding exists for the fault you haven't had yet: if a hot wire touches the metal frame of an inverter or enclosure, a proper ground gives that fault current a path to safely trip a breaker instead of energizing the case and waiting for a person to touch it. Off-grid systems typically need both an equipment ground (bonding metal enclosures and frames) and, depending on the system and local code, a system ground at a single point. This is genuinely one area where following the inverter and charge controller manufacturer's specific grounding diagram matters more than general advice, because grounding schemes vary by equipment.
Common mistakes worth naming directly
A few patterns are worth naming because they are easy to fall into on any off-grid wiring job:
Undersizing wire for the distance, not just the amperage, especially between panels and a distant charge controller
Reusing automotive fuses or breakers that aren't rated for DC solar's sustained current and voltage
Skipping the main disconnect, which makes maintenance and emergencies far more dangerous
Leaving battery cables unfused between the battery and the first busbar or switch
Mixing wire gauges on a single run without accounting for the thinnest section's limits
Not labeling circuits, so troubleshooting six months later means guessing
None of these mistakes are exotic. They're the boring, common ones, which is exactly why they keep happening.
Bringing it together with the rest of your system
Wiring decisions don't exist in isolation. They flow directly from decisions made earlier in your planning, like how much solar you actually need to run your home, which system voltage you chose, and whether you're leaning on a portable power station instead of a full fixed solar array. If you haven't nailed down your total power needs yet, it's worth working backward from how much solar you actually need to live off-grid before finalizing wire runs and breaker sizes, since undersizing the system itself just means redoing the wiring later anyway.
If you're still deciding between a simpler plug-and-play setup and a full hardwired system, it's worth revisiting the comparison of portable power stations versus a full solar system before you commit to running permanent wire through walls and conduit. And if you're in the early planning stages generally, the first six months of a small off-grid homestead covers a lot of the sequencing questions, like what to build first, that affect how your electrical system gets laid out.
For component-specific buying guidance, my gear guides organized by category walk through actual charge controllers, fuses, and cable options worth considering rather than just theory. And if you're working through a wiring plan and hit a question specific to your setup, my contact page is there, though for anything safety-critical, a local electrician or your equipment manufacturer's tech support should always be the final word, not a blog post.
When to call in a professional
There's no shame in hiring an electrician familiar with DC solar systems for the final connections, even if you've done the planning and the panel mounting yourself. This is especially worth doing if your setup includes grid-tie components, feeds a permitted structure, or involves battery chemistries (like large lithium banks) where a wiring mistake has real fire consequences. One workable approach is to do the bulk of the labor yourself and bring in a professional for a final inspection and sign-off on the battery and inverter wiring specifically. That's a reasonable, common way to split the work: you save on labor for the parts that are genuinely learnable, and you pay for expertise on the parts where a mistake is expensive or dangerous.
Off-grid solar wiring rewards patience and a willingness to double check numbers rather than eyeball them. The math is not advanced, it's addition, multiplication, and reading a chart, but the consequences of skipping it are not small. Slow down, size for the worst case, protect every wire close to its source, and label everything. That's most of what separates a system that quietly works for twenty years from one that becomes a cautionary story in a homesteading forum thread.
The rest of the shortlist
Recommended off-grid gear
Affiliate disclosure: Some links on this site are affiliate links, including Amazon links: as an Amazon Associate I earn from qualifying purchases. Buying through one costs you nothing extra, and it never changes what I recommend.
Products appear here only when they match this article's subject. Selection is based on documented specs and owner reports, never on compensation; pages with no relevant gear carry none.
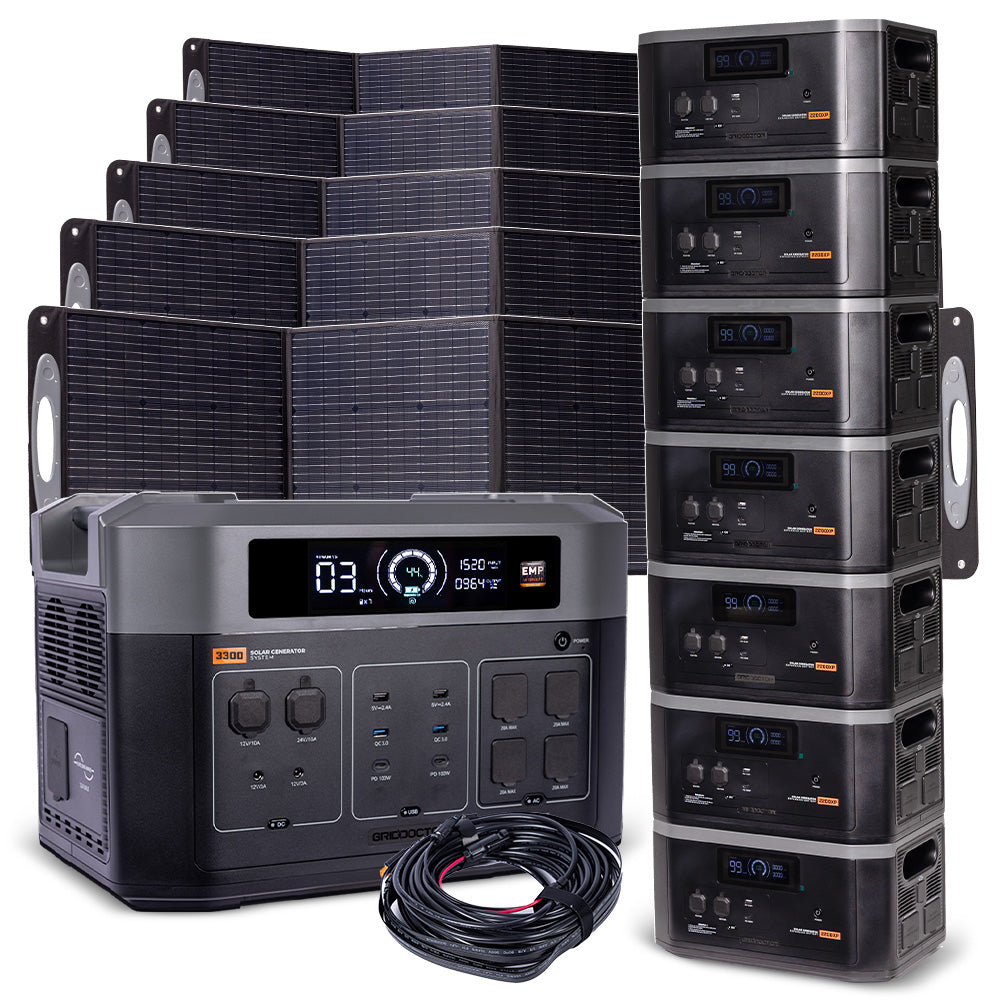
The Grid Doctor 3300-watt EMP-shielded solar generator sold through Emergency Essentials, a large power station for home backup and off-grid use; check the current spec sheet.
Why it's here: Listed through a second retailer so availability and pricing on this unit are not down to one storefront.
The Grid Doctor 3300 Power Tower, a large portable power station for home backup and off-grid systems; check the current spec sheet for capacity and output details.
Why it's here: Listed so form factor is part of the decision: this capacity class in a shape that stands rather than sits.
A grab-and-go power station for camping and cabin backup: no moving parts, simple controls, and owner reports lean heavily toward set-and-forget reliability.
Why it's here: Listed as the entry point to stored power: enough for a weekend or a backup, and small enough to actually carry.
Claim audit: 19 consequential claims checked against the article's sources; unsupported wording revised where it could not be substantiated.
Claim-by-claim audit (19 checked)
“Most electrical codes, including the guidance most solar installers follow, require that continuous circuits (running three hours or more, which describes almost everything in a so…” (cited → nfpa.org)
“A fuse or breaker's entire job is to open the circuit before the wire gets that hot.” (cited → extension.arizona.edu)
“That heat comes from resistance: electricity moving through a conductor generates heat, and the thinner the wire, the more resistance per foot, and the hotter it gets for a given c…” (reasoning shown in the article)
“the same 3,000 watt load pulls roughly 250 amps at 12 volts but only about 62.5 amps at 48 volts.” (reasoning shown in the article)
“Higher voltage systems need dramatically thinner, cheaper wire for the same power delivered, which is a big reason many larger cabins move to 24V or 48V battery banks.” (reasoning shown in the article)
“It accounts for real-world conditions: wire bundled with other cables loses some of its heat-dissipating capacity, ambient temperatures inside an enclosure run hotter than open air…” (cited → nfpa.org)
“DC systems run at low voltages compared to household AC, and low voltage systems lose a much larger percentage of their power over distance for the same wire gauge.” (cited → victronenergy.com)
“Voltage drop wastes energy as heat in the wire (again, heat) and it can starve appliances of the voltage they need to run properly.” (reasoning shown in the article)
“Charge controllers can also misread battery state if the sensing wire has significant drop.” (cited → victronenergy.com)
“The practical takeaway: for any run longer than a few feet, especially at 12V, size wire for voltage drop first, and check that it also satisfies the ampacity requirement (it usual…” (cited → victronenergy.com)
“Wire gauge charts that account for both amperage and distance appear in standard solar reference material, and matching your actual run length to the chart, not just the amperage, …” (rewritten to what the article can stand behind)
“A run from a battery bank to a nearby inverter might be fine on 4 AWG, while the same amperage over a 30 foot run to a detached shed might need 2 AWG or thicker to keep drop accept…” (reasoning shown in the article)
“For DC solar applications, look specifically for fuses rated for DC use (an AC-rated fuse may not safely interrupt a DC arc, which behaves differently than AC because there's no na…” (reasoning shown in the article)
“DC-rated breakers are essential here too; using an AC breaker on a DC circuit is a common and dangerous mistake because it may not interrupt a DC fault reliably.” (reasoning shown in the article)
“A fuse protects the wire downstream of it, which means the fuse needs to sit as close as possible to the power source, ideally within a few inches of the battery terminal for the m…” (cited → victronenergy.com)
“Off-grid systems typically need both an equipment ground (bonding metal enclosures and frames) and, depending on the system and local code, a system ground at a single point.” (cited → extension.arizona.edu)
“A few patterns are worth naming because they are easy to fall into on any off-grid wiring job:” (rewritten to what the article can stand behind)
“One workable approach is to do the bulk of the labor yourself and bring in a professional for a final inspection and sign-off on the battery and inverter wiring specifically.” (rewritten to what the article can stand behind)
“if a hot wire touches the metal frame of an inverter or enclosure, a proper ground gives that fault current a path to safely trip a breaker instead of energizing the case and waiti…” (reasoning shown in the article)
Before you go
One useful off-grid email a week.
Practical gear rundowns, honest how-tos, and plain-English guides from someone doing the homework in the open.
I am building a place for off-grid people to swap real answers: a forum by topic, classifieds for gear and services, and real estate for off-grid land and homes. It is new, so the early members shape what it becomes. A free account lets you post in all three.
No ER ten minutes away means you have to be your own triage nurse. Here's how to tell a bad bee sting from the real emergency, and what to actually stock.
In many off-grid disasters, the fire or flood itself isn't the decisive factor, it's the hour you waited too long to leave. Here's how to set real, numeric triggers before you need them.
Tax sale and sheriff's auction land looks like a bargain, but redemption periods, hidden liens, and unseen parcels turn a lot of cheap acreage into an expensive lesson. Here's how to vet a listing before you bid.